Perfect Projects With Guides And Patterns
How many times has your woodworking project required a symmetrical shape like hearts, an inlayed oval pattern in the box lid or the need to have parts with exact size and shape? This is where the router guide and pattern process can make your projects perfect every time.
The basic principles of this operation is divided up into three elements, the pattern, the guide and the router bit. The pattern is usually made of a material that is easily shaped like plywood, hardboard, or polyethylene. Guides usually have a variety of flange diameters and are made of brass. The router bits can be a variety of different shapes and sizes but must have one common feature, they must be able to plunge into the material.
The Pattern
The basic elements of the pattern are the pattern thickness, the pattern infield and outfield.
The material thickness of the pattern should be not be more than 1/4”. Why? Because the greater the pattern thickness the further away the cutter is from the material surface. Remember that the pattern thickness will diminish the cutting depth of the router bit and increase the possibility of router bit chatter. All of the patterns that we use are made of 1/4” polyethylene.

The pattern infield is our reference to the amount of the cutting area of the pattern. The pattern outfield is our reference to the support area around the pattern. Why is this important? The base of the portable router must be supported by the pattern, which will keep the router bit cutting perpendicular to the project material. To do this the router bit/guide must be running freely within the pattern and the router base must have direct support all around the pattern edge.
Pattern Quality is important:
Remember, the quality of the pattern edge is directly related to the quality of your finished project. If you have a wavy edge on your pattern you will have the same wavy edge on your project.

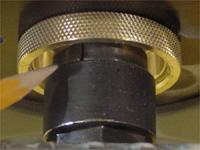
The guide
The basic elements of a guide are the material type, inside guide diameter, the size of hole the guide fits into, the inside diameter of the flange and the outside diameter of the flange.
Material type and inside guide diameter:
The best guides are made of brass. The brass material gives the best locking qualities and is non-ferrous. The locking quality of brass helps to hold the guides in place throughout the process and the non-ferrous material is less likely to damage the carbide router bit on accidental contact.
Select a guide that will allow your router bit to turn freely in the guide.

With the correct inside guide diameter the router collet and bit are allowed to get closer to the cutting surface of the project material, which also reduces tool chatter. NOTE: The guide needs to have an equal space all around the router bit, which puts the guide in the center of the collet. This type of guide needs to have a router base plate with the larger hole with pre-drilled mounting screws to ensure the guide is mounted on the center of the router collet.
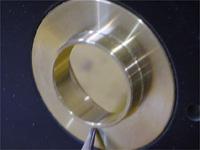
Flange diameter on the inside and outside:
The inside diameter of the guide flange is used to determine the maximum diameter of router bit that can be used in the guide. To find out which guide fits with which router bit you need to know the largest diameter of the router bit first then compare it with the inside diameter of the guide. Most suppliers of guides and router bits give this information in their catalogs. The size of your finished pattern can be determined by calculating the difference between the outside diameter of the guide flange and the large diameter of the router bit.
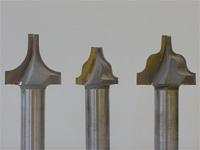
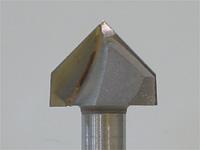
The Router Bits
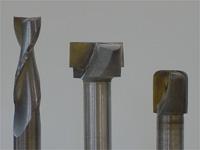
Plunge router bits are used with patterns. Straight cutters cut the pattern or choose a profile cutter that moves freely in your selected guide to do both the cut and profile at the same time. Take a look at some of the different router bits that can be used to cut patterns.
Test Your Skills
To understand what determines the size of your pattern shape, try this: Use only one size of pattern to make two different sizes of the same pattern. First cut the pattern with a 1 1/2” guide using a 1/2” straight bit then change the router bit to a 1/4” router bit and cut another project pattern.
Does the changing of the size of your router bit change the size of the pattern?
If so, which one of the samples is larger, is it the one cut with the 1/2” straight bit or the one cut with the 1/4” straight bit.Next, can you get the same results by keeping the router bit the same and changing the router guides? If so, which combination of guides would give the same results?