Valentine Project Tip 3
The tips for the valentine project, a personalized box sized to enclose a gift for Valentine Day, are complete with this the third tip. Make a base to fit your box and choose the right bits for the finishing touches. Use a V groove bit for lid/box intersection and your choice of profile for the base. Also in this tip we introduce, Lu’s “Finish It” section. Wood projects are not finished until a final paint or stain and varnish coating has been chosen and applied on the newly crafted project.
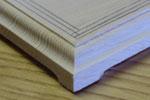
Molding the top of the box
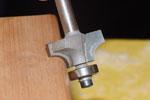
Choosing the right router bit. Three dimensions are important when choosing the right router bit to mold the edge. 1) the size of the pilot bearing, 2) the overall diameter dimension, and 3) the height of the cutting edge.

Before we can pick the right router bit to use to mold the top of the box we must consider the following: 1) What is the thickness of the box top? 2) Does the chosen bit look good on the box?
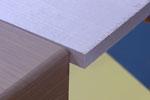
So why is it important to know the top thickness before choosing the router bit to mold the edges? If the thickness of the box top is 3/8” then the depth of the router bit must shape and mold the edge of the box within that dimension and leave material below the mold. If the thickness is more than 3/8” then we will have the molding bit cutting a hole through the top of the box.
The criteria to choose suitable router bits that do not exceed the top thickness is determined by the height of the cutting edge. Example: the round over router bit will work well on the box but if we use a 1/2” radius round over bit we are going to exceed the thickness of the top. We need to work within the perimeters of the box thickness. We need to use the 1/16” radius, 1/8” radius or the Ľ” radius round over router bits. Measuring the height of the cutting edge is the best way to not exceed the top thickness.
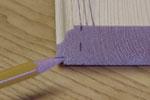
V Groove cut on lid/box
Once the lid is molded and the box has been cut apart, to finish the lid/box joint install a V groove bit in the table-mounted router. Position the table fence so the point of the bit is centered on the joint where the lid meets the box and set the depth of cut to make a shallow (1/16”) V.
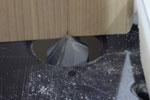

Put masking tape across the joint on two ends while cutting the two sides to hold the lid and box together. Change the tape to the two ends to cut the V groove in the sides.

This cleans the edges of the cut and gives a finished look.
The Base
The calculator does not make the base calculations because different router bits will need different amounts of material to make the base look good and not every box needs a base. The first step in making the choice to put a base on the project is to choose the router bits. You can use common bits like the cove bit, round over bit, and the roman ogee bit. On the base we don’t worry about the thickness of material but must worry about the look of the base. Here is where cuts of the router profile on the edge and end of a sample piece will help you to pick the right bit for your project. Cut samples on test pieces of the material to determine which profile looks best. Your samples will also help you choose the right space between the base of the box and the cutter profile.
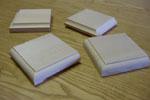
Once the bit has been chosen the next step is to determine the length and width of the base. We need to consider the space between the box and profile edge and the amount of room needed for the router profile. In the beginning the best way to do this is to cut samples and measure them.
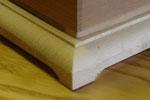
Another consideration is to compare the size of the box to the size of the base. A large box may need a stacked base. Use the sample blocks to identify the best router bit profile to stack together. See Photos
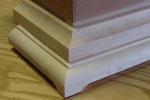

As time goes on you can determine the cutter profile by simply taking the pilot diameter away from the overall diameter and divide the result in half. You then add two of the space measurements to the length and width of your box to arrive at the base size. See example below.
Example: Our sample router bit has a ˝” bearing with an overall diameter of 1 Ľ” and the space between the box and profile edge is 1/8”. We have 1 Ľ” – ˝” = ľ” divided by 2 = 3/8”. The material required to cut the profile of this router bit is 3/8”. We now have to add the 3/8” of the profile cutter to the required 1/8” space which equals ˝”. The results show that we need a ˝” of extra material all around our box to make the base. So to determine the size of the base we add 2 X ˝” measurements or 1” to the length and width of the box we have made. If the length and width of the box is 6” square then the base will have to be 7” square. You may wish to make the box without a base. This is an acceptable alternative.