Valentine Project Tip 1
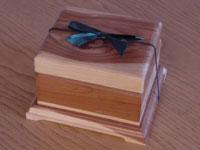
St. Valentine was a martyr who was put to death on February 14, 270 AD for continuing to perform marriages, which was against Roman law under Claudius II. Since that time Valentine's Day has been a time for telling loved ones that you care not just romantic love of spouses but all love for family, friends and neighbors. The many gifts given on Valentine's Day like chocolates or jewelry etc. can be personalized by offering them in a handcrafted box.
The box calculator on our web site is particularly helpful to ensure the box you make is a suitable size to enclose your gift. Once you have determined the inside measurements, use this calculator to establish the pieces you need in the exact measurements to make this gift box. Try it!
This year give a personalized Valentine!
Step 1: Deciding what to make?
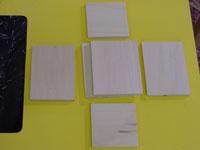
The hardest part is deciding what type of gift item is going to be wrapped in your custom handcrafted box. It is best to have the actual gift beside you when using the box calculator. If you prefer why not make the handcrafted box your unique Valentines gift. Here are some samples of products you can make a box to fit.


Step 2: Using the box calculator
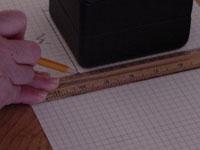
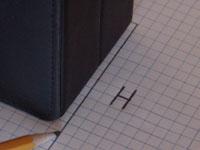
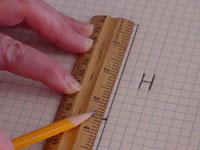
The following pictures show how to determine the inside size of the box you require. Lay the gift on squared paper and then measure to come up with the width, length and height for the inside size of the box.

Next we open the calculator and answer the questions on the calculator interface.


There are questions like: How many boxes are you building? What is the overall length, width and height of each box? What is the material thickness of the box? The most important question when building a custom box for a specific product is: What type of dimensions are these, inside or outside measurements?

Once these questions are answered simply push the calculate button and wait for the material list for your custom box. Link to Box calculator.
Step 3: Keeping the pieces straight
Read and understand the cut list. You need to understand the width, length, and the thickness measurements of each of the pieces. To bypass sizing the material yourself for the custom made boxes, ask your local retailer to provide material sized to the calculator determined cut list.
Always Safety: You do not want to lose concentration when using the router. For safety identify all the pieces AFTER the sizing process and BEFORE the routing operations. Mark an X on all of the edges that need a rabbet joint. The top and bottom (or T and B) should be marked for rabbets on all four edges. If you are making many different size boxes at the same time, you need to identify each box. Use T1 for top of the first box and B1 for the bottom of the first box. The second box will have a T2 and B2 and so on.

Tools we use: For the step-by-step instruction on how to process and assemble the Magic Boxes see the book, Router Projects Volume 1.
Step 4: Tips on sizing
After we have the material list the next step is to cut the pieces to size. Here are a few tips that experience has taught us over the years.
One: If we are using solid material, the first operation is ensuring that we have enough material at the correct thickness. First, rough cross cut the material into lengths, surface joint one face level, and edge joint the best edge. Next, plane the wood to thickness always keeping in mind that it is best to size all the material at once.
Two: Looking at the width dimension on the material list, choose the widest as the first pieces to cut. This technique establishes the correct direction of the grain in the solid wood. If we are using a MDF or particle board for painted boxes it is not as important to keep the width of the piece going in a certain direction. Cut the largest pieces first, then move to the next largest and so on. This way if a mistake is made the larger piece can become one of the smaller pieces. If we have the reverse this will not work. For these kinds of problems the wood stove comes in handy for more than heat. Here’s where the woodworker obliterates all evidence of a mistake and adds the cost of the extra material to experience.
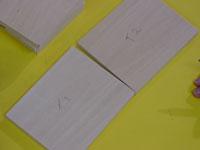
Three: Once enough lineal feet of the width dimension has been ripped, cross cut pieces for the top and bottom to the correct length. When the cuts on the top and bottom pieces are complete we should mark a light pencil mark T for top and B for bottom on the best face side of each piece. We like to mark the face side because after assembly the marks help to determine which pieces have been sanded and which ones have not. Also could you imagine trying to sand off your marks on the inside of a small box.
Four: Here is where we recycle all of the left over material from the tops and bottoms by resetting the rip fence of the saw to the next smallest width. Remember we want to be sure to cut enough material on the one set up because multiple setups can cause mistakes that show up in the assembly process. Next is to crosscut the side parts and mark them front, back and ends with pencil on the face side. Optional tip: To make sure you will cut the rabbet joints in the right places, mark the ends of the front and back with an X. There are no rabbet cuts to be made on the ends.
Always Safety: Thinking & Planning Time First
You do not want to lose concentration when using the router. For safety identify all the pieces AFTER the sizing process and BEFORE the routing operations. If making many different sizes at the same time, decide how to mark each piece. Use T1 for top of the first box and B1 for the bottom of the first box. The second box will be T2 and B2 and so on. Here is a great time to also mark an X on all of the edges that need a rabbet joint. On the T & B the X should be on all four edges.>
Next: Valentine Project Tip 2
Check out this next tip on setting the bit depth, the width of cut, and choosing the right router bits. Click here to view the Valentine Project Tip 2.