Valentine Project Tip 2
In tip 1 you determined what gift (if any) will be enclosed in the personalized valentine box, how to calculate the box pieces and how to size and mark the box pieces. Tip 2 will explore router bit choices and the setups for the router cutting operations.
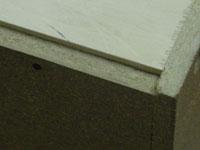
What is the rabbet joint?
A rabbet joint is a linear stepped notch in the side of a project piece. It is made either with the grain or across the grain of project pieces

The most common uses of this wood joint are 1) sides to back panel for furniture 2) sub top support pieces and 3) fasten two pieces at 90 degrees as in the assembly of a box or drawer. This joint can be used in any place that requires a 90-degree corner.
Step 1: Choosing the right router bit for the rabbet joint
There are many different types of router bits that will work to make the rabbet joint. You can use a rabbeting bit, a bottom-cleaning bit or a straight bit. The most important features of the router bit required to make the rabbet joint is a straight cutting flute that is designed to cut on both the side and the top. The strength of the joint requires the cutter to make a clean straight notch cut, which will affect the assembly and gluing process. The rabbeting bit and the bottom-cleaning bit both have these features.
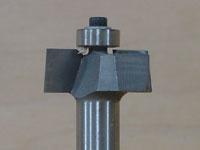
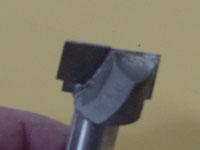
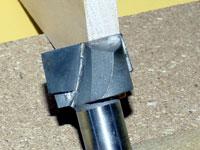
Rabbeting Bit
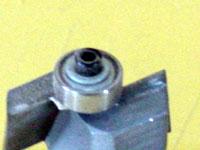
Bottom-cleaning Bit
The side cutting edge makes the cut into the side of the material and the top cutting edge makes a clean cut at the base of the joint.
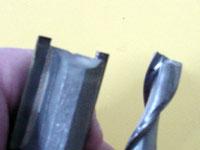
There are different types of straight bits but they are not the best bits of choice for a rabbet joint.The spiral bit as the name states has spiral side flute with the plunge cutting top. This cutter is designed to plunge holes and make square mortises. The straight bit in most cases has a straight cutting edge with no cutting edges on the top. It is designed to cut on the side only making open-ended grooves and dados the cuts of choice.
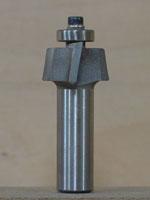
The rabbeting bit, as the name indicates, is designed to cut rabbets. The features of the rabbeting bit are as follows: A. It has a shallow flute length. B. It has a large diameter. C. The top edge of the cutter has been sharpened and is designed to cut.
Additional features on some rabbeting bits are the 1/2" diameter shanks, and bits with a sheer angle. The sheer angles increase the cutter's performance.
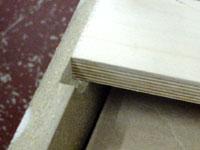
When choosing the bit for our rabbet joint, we need know the thickness of material being used. A good rule when determining the width of the bit to be used is "the router bit must be at least twice as wide as the thickness of the material". If we are cutting a 3/8" rabbet joint we need to use a bit that is at least 3/4" wide, makes a straight cut, and will cut clean on the top of the notch.
Step 2: Setting the width of cut
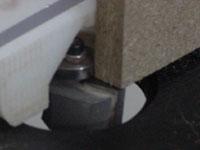
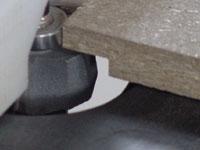
UNPLUG the router for setup. Install a rabbeting bit in the table-mounted router.
Locate and mount the out-feed side of the table fence. Start the router and carefully swing the fence into the moving cutting tool to establish chip clearance (for more information follow the link).
Turn off and UNPLUG the router. Using a sample of the project material set the fence position to expose the bit to the full thickness of the sample material and clamp the in-feed side of the fence to the table.
Step 3: Setting the depth of cut
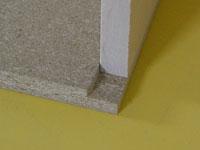
Note: In the calculator-generated material list you received, the calculations for the depth of the rabbet cuts are based upon 1/2 of the material thickness. Reasons to set the depth of cut at 1/2 of the material thickness are: A. maintain the side material strength, B. give the joinery the required gluing surface and C. simplify the process of calculating the material.
Here is a simple way to set the proper depth of cut to 1/2 of the material thickness.
- Mark the piece roughly to the center.
- Set the depth of your cutter to the mark.
- Start the router and cut the corner of the sample material.
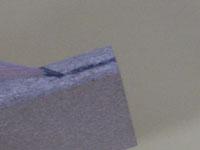
To check the rabbet cut, flip the piece over and make another test cut in the same corner. Three things can happen depending on the height of the router bit. 1) You can be right on the center and the two cuts will meet.
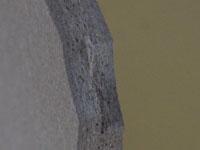
2) You have the cutter too low, there will be material exposed on the intersection.
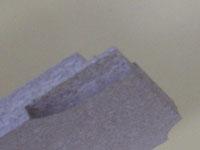
3) You have the cutter too high and there will be no material exposed but the cuts will overlap. Adjust the bit height if necessary.
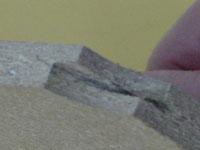
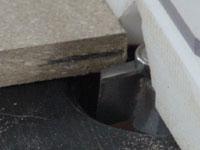
Step 4: Make the rabbet cut
To test the setup, use sample pieces to make the rabbet joint. ALWAYS feed the material into the cutter. Dry fit to see how it turned out!
Bonus: Heart Inlays
Here is a great place to add our tip on inlays. Put a heart inlay in the top of your Valentine box before you assemble the project.