Series 300
Exciting and different projects are featured in Series 300 of "the Router Workshop". Bob and Rick show you how to rout new Panel Doors for your kitchen cabinets. Dress up your plywood furniture projects by facing the edges with solid lumber. Use doweling for the shelves in this unique CD Storage. Build a drop leaf, Pedestal Table with three legs dovetailed onto a turned pedestal. Box joints on an angle make six sided projects easy. The End and Nesting Tables provide two tables that store together but slide apart for that extra serving table! Construct them with the ultimate in joinery, the mortise and tenon joint made with the router. Decorative woodwork is evident in the Swiss Railing. Angled panels and wrought iron hardware set off the Swiss Cabinet.
301 - Kitchen Cabinet Doors
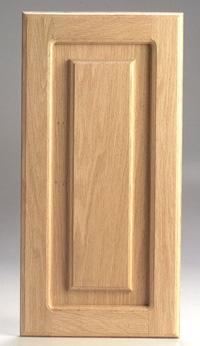
Raised panel doors with standard Router Bits? It's true! On this show of the Router Workshop, Bob and Rick will show you the easy way to make an attractive panel door for any cabinet using your 1/4 straight bit, a 1/4" round over bit, 3/4" flat bottom bit and the 3/8" rabbeting bit. They show how to mortise the stiles, cut the tenons, create the frame and give it style with beading and rounding techniques.
302 - 303 Two Part - The Night Stand
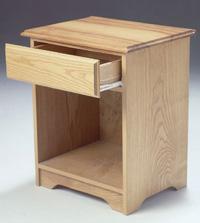
Decorating and furnishing a bedroom is no easy task! In this two part program of the Router Workshop Bob and Rick begin work on a night stand, perfect for any bedroom. 302. Night Stand, Part 1 Case Work Up first is the case work. Bob cuts dados in the sides for the bottom and centre rails. Learn how to face a plywood edge with solid material. Rick has some fascinating dado techniques and router jointer cuts to make a relief in the toe space! This is part one of a two part project. 303. Night Stand, Part 2 Drawer Bob explains the 'easy-link' method for joining the drawer sides to the front. Dados hold the drawer back and bottom. Rick has tips on different ways to fasten the drawer front and explains some optional hardware for the project.
304 - CD Dowel Storage
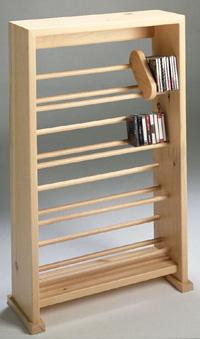
Storing and organizing CDs and Videos is as simple as watching TV! That is if you're watching the Router Workshop. Combine dowels with shelving to create this attractive storage unit. Bob works on the exterior: cutting the top, bottom and sides while using a 45 degree rabbet. Then, it's time to drill the dowel holes and finish the bottom. Make dowel with a bull-nose bit.
305 - 306 Two Part - The Pedestal Table
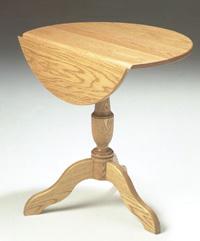
Making a pedestal drop leaf table might seem like a complicated procedure but Bob and Rick Rosendahl make it easy with the router! Three legs support a turned column block. Dados hold the support slides. We use the router to show an innovative way of cutting the top round. Rick has some tips on matching the cove cutter so the leaves come out even. 305. Pedestal Table, Part 1 Tabletop Make the drop leaf top for the pedestal table. 306. Pedestal Table, Part 2 Legs Watch father and son work on the pedestal column and curve the legs identical to each other.
307 - Six Sided Basket
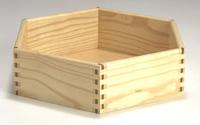
Beautiful projects are made simply. Take this fruit bowl for example. Bob Rosendahl shows how a simple router procedure can make perfect fitting box joints. Rick has tips on cutting the splines to fit the slots and gives insight into box-joint angles. One project, one show, one tool!!
308 - 309 Two Part - End and Nesting Tables
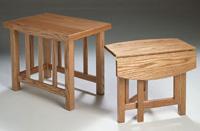
Two tables in one! Watch as Bob and Rick Rosendahl take you step by step through phase one of the project: the end table. Learn how to mortise and tenon, mold the table sides and top. You'll also learn how to dress the outside edges of the legs, giving your table a beautiful appearance. The nesting table provides the second table. It slides into the bottom of the end table when it is not needed. This gate leg table is convenient when an extra side table is needed. 308. End Table, Part 1 309. Nesting Table, Part 2
310 - Swiss Balcony Railing
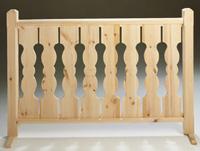
Railings with a router! In this show of the Router Workshop, Bob and Rick Rosendahl take you step by step through coping, dadoing and molding your own Swiss Balcony Railing, perfect for your kitchen, living room or deck! Plus, Rick will show you different rail designs and easy ways to make it happen.
311 - 313 Three Part - Swiss Cabinet
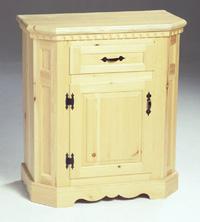
The Swiss cabinet is designed along the lines of furniture prevalent in Switzerland. Some features that are ideal for the router are the patterned toe space, the angle panels that join the sides and the front facing, the sculpted apron and the panel door and drawer. Big projects don't seem so big when you break them down into easy steps. 311. Swiss Cabinet, Part 1 Case Work Make case work dados, adjustable shelf holes and mold the top of the cabinet (Part 1 of 3). 312. Swiss Cabinet, Part 2 Facings In part 2 of this 3 part program, Bob and Rick show you an easy way to mortise and tenon the facing, to cope mold the toe space and to cut the angles on the facing, side panels and sides. Look for tips on pattern work. 313. Swiss Cabinet, Part 3 Door Bob and Rick finish the project with drawer and door construction that is all done with the Router. Assemble the parts to complete the Swiss cabinet (part 3 of the 3-part program).